I made these boxes to fit three to a shelf, and they fit perfectly! They are 11" deep, which is how deep my bookshelves are and I love that they don't jut out like the regular office boxes. Making these was also much more economical that buying shelf storage boxes at $10+ each. I just used paper I loved, Mod Podge, tacky glue, scissors, ruler and box cutter.
Choose your size box and assemble. I taped my box together like usual, but ended up gluing the inside flaps down with tacky glue (and weighed them down with some 2 lb hand weights). However, careful taping the bottom together, if the tape doesn't go down smoothly (wrikles) then it will show up as a wrinkle in the paper no matter how much you try to smooth it down. This happened to me, but I didn't worry about too much since it was on the *bottom.*
Then I put the long piece of paper on. This one was cut about 1/4" less than the box on each side. I glued down the bottom first, and then did the sides. The paper was about 1" longer than height of box on each side to be able to fold over top to inside.
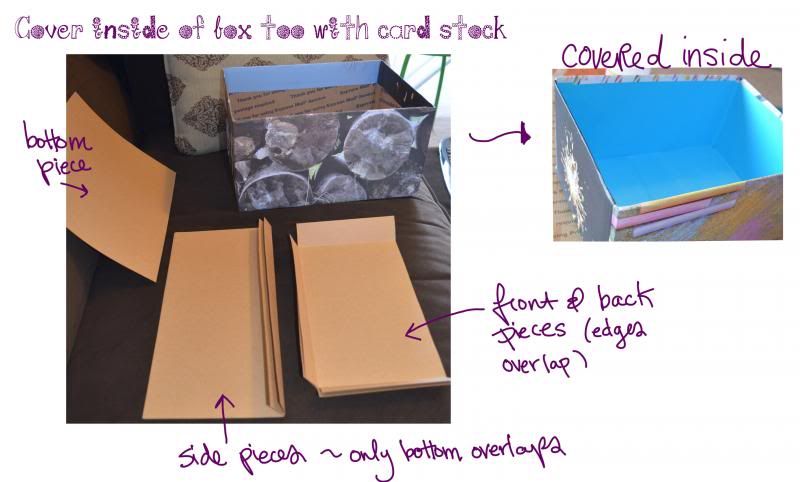
I cut plain scrapbook cardstock to size to cover the inside of the boxes. The front and back sides of the box I added about 1" extra to bottom and sides, I measured it so it would end about 1/2" from top edge. I glued those first, then I glued the sides, which only had an extra 1" on bottom and were cut to have about 1/8" space on each side (if you cut it the exact length of the box it will be too long). Then I glued the bottom, paper was exact size of bottom, no overlap needed.
The box lid was made from a flat piece of cardboard. Measure your box, then add about 3/8" to both the dimensions. This makes the inside gray rectangle above. Add 1.5" (or however wide you want the lid to be) to each side. This makes the black rectangle. Place your box over it to make sure the size of the box seems right, you don't want to make it too tight or too loose. Cut out with box-cutter and ruler to keep lines straight. Gray lines are score lines to help you fold over the sides- don't press too hard and cut through! Carefully cut the little lines to make the flaps, fold them inside and glue them with tacky glue (or just lots of white glue). Keep from sliding apart with jumbo paperclips while it dries. Cover the box in coordinating paper.
Shared at:


Yesssss! This is just what I needed, thank you so much. I loveeeeeeee it!
ReplyDelete